Friday, December 4, 2015

Mycoplasma Pneumoniae (MP) Antibody(IgM) Test

Introduction:
Mycoplasma pneumonia is associated with various non respiratory diseases such as meningitis, encephalitis, pancreatitis and arthritis. Culture of the organism can be used for the diagnosis of infection, however it will be difficult because it is insensitive and takes about 3 weeks for the result. For this reason, we only apply serological method for the diagnosis of M.pneumonia infection in our laboratory.


Principle of the test:

(Colloidal Gold Chromatography)
The Control region consist of HAMAs;
 Test region consists of MP antigen;
 Sample well consists of anti-human MP antibody.

If the sample containing MP antibody, it will form complexes with the anti-human MP antibody.
The complexes will then bind to the immobilized MP antigen and forms a red line at the test region while the unbounded complexes will be captured by the HAMAs at C region and form red line indicating the validity of the test kit.


Sample Preparation:
Fresh whole blood, plasma or serum is used as the cardiac proteins are relatively unstable.


Procedure:
  1. Add 1 drop of the sample (30μl) and 2 drops of buffer to the sample well of the test panel.
  2. Start the timer ( 15 minutes)    *if after 20 minutes, the result will be invalid.*


Interpretation:

  • Solely Control line --- Negative
  • Solely Test line --- Invalid
  • Both Control and Test line --- Positive

Thursday, November 26, 2015

Various tests' kit/cassette in [Fluid and excretion department]


(PS: The red line at the control area implies that the kit is functional.)


Rota virus test
   2 drops of the solution ( stool + buffer ) and wait for 10 minutes.
If there is red line shown on the test area, indicate that the test has positive result.


UPT test/ Pregnancy test/ HCG test
3 drops of urine were inserted into the sample well and wait for 3 minutes for the result.

OR

Use the pregnancy test strip.

1. Dip the test strip into patient's urine.
2. Read the result after 3 minutes.


Occult blood test

   2 drops of the solution ( stool + buffer ) and wait for 10 minutes

Urine FEME

Methodology:
  1. Immerse one Urine strip into the patient's urine.
         

    Urine strips box.

  2. Place the urine strip into the analyzer for color determination.
    And counter check the test strips result from the analyzer with the color on the box.


    Blue : Strips Box   ; Red : Analyzer    ;Green : Urine strip
  3. Centrifuge the urine which inserted into the test tube.


  4. Dispose the supernatant and dissolve the sediment with remaining liquid and make a slide.
  5. View the slide with cover slip under microscope.


Additional information:

When there is nitrate presented in the patient's urine, we can look for the presence of bacteria to verify the positive result under microscope.


Result interpretation chart in our lab.

* hpf : observe in high power field  ;   lpf : low power field *


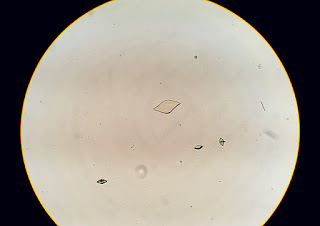
What can we find within Urine?


1. What is this?

The crystal under 10x of objective.

Calcium Oxalate ( 40x ) * Envelope shape* 
*Dumbbell shape* Calcium Oxalate ( 40x )


2. What is this?

The round cell with granules on left top is WBC.


3. What is this?


Haemolysed RBC has spiky morphology.(picture above)


One of the patients' sample which consists of more than 200 RBC


4. What is this?


There was one case, the pellet of the urine after centrifuged was milky in color. 
And under microscopic view, we saw this.

Amorphous Urate
(If in alkaline urine, called as amorphous phosphate)


5. What is this?

Under 10x of objective.
(Red: Hyaline Cast    ;  Blue: Epithelial cells)

Hyaline cast under 40x of objective.


Different types of cast under 10x of objective.


6.What is this?


Uric acid (lemon/leaf-shaped)

10x
40x


7.What is this?


Spermatozoa (head with tail)
8.What is this?


Yeast ( Oval-shaped and forms budding)


Pictures for references:

Crystal

Picture


Cast
Picture

casts in urine

Urine Casts


Wednesday, November 25, 2015

Urea Breath Test

Besides expose to the biochemistry analyser, I also have the chance to run the urea breath test using Urea breath test analyser ( Brand: Pytest ).

This test is used to monitor the treatment undergo by patient which suspected to be infected by Helicobacter pylori .
There are a few advantages using this test :
  •  Cost effective
  •  Shorter Turn around time
  •  Not invasive


  • Checklist

    • Calibration
      • Make sure there is no fingerprint on the Background sample ( BKG )
      • Make sure there is no fingerprint on the 14C Reference Standard
    • Check if there is air coming out from the vial tubing after the machine is switched on.


  • Methodology


  • Procedure 1:

    1. Swallow a yellow pill (Urea) with one small cup of water and wait for 3 minutes.
    2. Then drink another cup of water and wait for 7 minutes.
    3. Blow the balloon.


  • Procedure 2: 
  • All the equipment needed for Urea Breath Test.


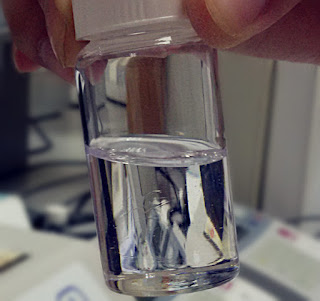
    Add 2.5ml PYest Urea Breath Test reagent (Blue in color and a store in amber bottle)  into a bottle.

    Insert the balloon tubing into the balloon and vial tubing into the bottle.

    Remove the tubing when the solution turns colorless.


    Add 10 ml Scintillation fluid into the bottle.


    Swirl it gently until the solution turns clear.


    Insert the bottle into the hole of the analyzer.

    Press the [ Count ] button to start the analysis